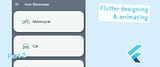
Flutter | มาลองทำแอป Icon Showcase || Part I การดีไซน์
Created on Jan 04, 2020
พาร์ทอื่นๆ
- Flutter | มาลองทำแอป Icon Showcase || Part II อนิเมชั่น
- Flutter | มาลองทำแอป Icon Showcase || Part Extra Bloc+Animation
เริ่ม
หลังจากไม่ได้เขียนมาซักพัก รอบนี้มาลองทำแอป Icon Showcase โดยจะประกอบไปด้วย 2 ส่วน การดีไซน์ กับ การทำอนิเมชั่น แต่ในรอบนี้จะมีเฉพาะส่วนการดีไซน์ก่อน เพื่อไม่ให้ยาวจนเกินไป
ครั้งนี้ เราจะมาแนะนำ Widget ต่างๆดังนี้
- Card
- ListTile
- SafeArea
- Stack
- Positioned
- Align
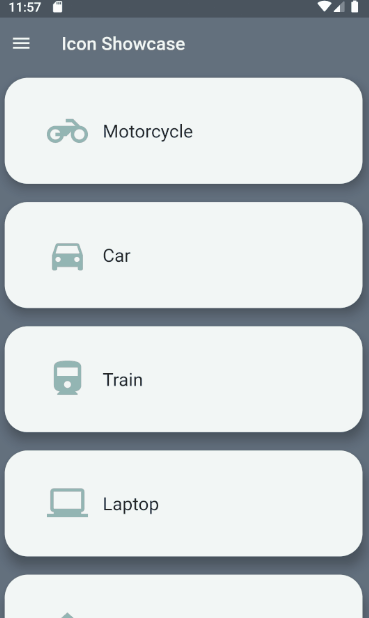
แอปเราจะประกอบไปด้วย 2 หน้า หน้าหลัก
(main.dart)(detail_page.dart)หมายเหตุ โค๊ดที่นำมาลงประกอบนั้น จะเป็นโค๊ดที่เขียนเสร็จแล้วของพาร์ทนั้นๆ ดังนั้นอาจจะมีโค๊ดบางส่วนที่ยังไม่ถูกอธิบาย ณ ตอนนั้น แต่จะวนกลับมาอธิบายในส่วนถัดๆไป แนะนำให้ลองโหลดไฟล์ท้ายโพสมาลองรันไปควบคู่ไปกับการอ่านจะช่วยให้เข้าใจได้ง่ายขึ้น ถ้าพร้อมแล้วก็ไปต่อกันเลย
การเตรียมการ
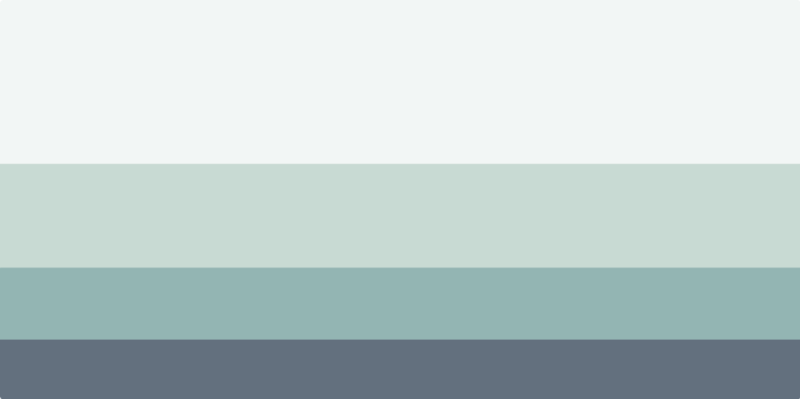
ชุดสีที่เราจะใช้ตามนี้
- #F2F6F5
- #C8DAD3
- #93B5B3
- #63707E
เราก็ดำเนินการสร้างไฟล์
color_palette.dart| import 'package:flutter/material.dart'; | |
| class ColorPalette { | |
| static Color grey10 = Color(0xFFf2f6f5); | |
| static Color grey30 = Color(0xFFc8dad3); | |
| static Color grey60 = Color(0xFF93b5b3); | |
| static Color grey90 = Color(0xFF63707e); | |
| } |
ทีนี้ เราก็เรียกใช้สีของเราได้ง่ายๆแล้ว
ต่อมาเตรียมข้อมูลที่ใช้แสดงกันต่อ สร้างไฟล์
icon_data.dart| import 'dart:core'; | |
| import 'package:flutter/cupertino.dart'; | |
| import 'package:flutter/material.dart'; | |
| class IconModel { | |
| final String title; | |
| final IconData icon; | |
| IconModel({this.title, this.icon}); | |
| } | |
| final List<IconModel> iconList = [ | |
| IconModel(title: 'Motorcycle', icon: Icons.motorcycle), | |
| IconModel(title: 'Car', icon: Icons.directions_car), | |
| IconModel(title: 'Train', icon: Icons.directions_railway), | |
| IconModel(title: 'Laptop',icon: Icons.laptop_windows), | |
| IconModel(title: 'Home',icon: Icons.home), | |
| ]; |
เราจะสร้างรูปแบบข้อมูลขึ้นมาก่อนจะได้เรียกใช้ง่ายๆ ตั้งชื่อว่า
IconModeltitleiconListIconModeliconListการเตรียมการเรียบร้อยแล้ว เราก็มาเริ่มการดีไซน์
หน้าแรก main.dart
main.dart| import 'package:flutter/material.dart'; | |
| import 'package:icon_showcase_design_part/color_palette.dart'; | |
| import 'package:icon_showcase_design_part/icon_data.dart'; | |
| import 'package:icon_showcase_design_part/detail_page.dart'; | |
| void main() => runApp(MyApp()); | |
| class MyApp extends StatelessWidget { | |
| @override | |
| Widget build(BuildContext context) { | |
| return MaterialApp( | |
| title: 'Icon Showcase', | |
| theme: ThemeData( | |
| primarySwatch: Colors.blue, | |
| ), | |
| home: MyHomePage(title: 'Icon Showcase'), | |
| debugShowCheckedModeBanner: false, | |
| ); | |
| } | |
| } | |
| class MyHomePage extends StatefulWidget { | |
| MyHomePage({Key key, this.title}) : super(key: key); | |
| final String title; | |
| @override | |
| _MyHomePageState createState() => _MyHomePageState(); | |
| } | |
| class _MyHomePageState extends State<MyHomePage> { | |
| @override | |
| Widget build(BuildContext context) { | |
| return Scaffold( | |
| backgroundColor: ColorPalette.grey90, | |
| appBar: AppBar( | |
| backgroundColor: Colors.transparent, | |
| elevation: 0.0, | |
| title: Text( | |
| widget.title, | |
| style: TextStyle(color: ColorPalette.grey10), | |
| ), | |
| leading: Icon( | |
| Icons.menu, | |
| color: ColorPalette.grey10, | |
| ), | |
| ), | |
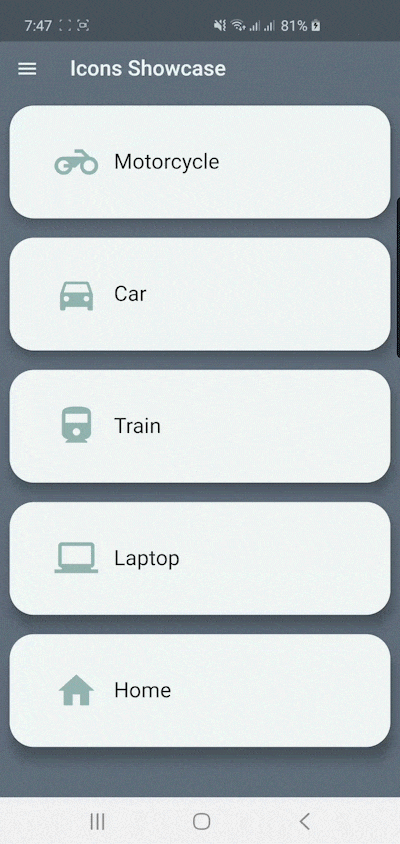
| body: ListView.builder( | |
| itemCount: iconList.length, | |
| itemBuilder: (context, index) => InkWell( | |
| onTap: () => Navigator.of(context).push(MaterialPageRoute(builder: (context)=> DetailPage(iconData: iconList[index],))), | |
| child: Card( | |
| color: ColorPalette.grey10, | |
| margin: EdgeInsets.all(10), | |
| elevation: 10.0, | |
| shape: RoundedRectangleBorder( | |
| borderRadius: BorderRadius.circular(25.0)), | |
| child: Padding( | |
| padding: const EdgeInsets.all(30.0), | |
| child: ListTile( | |
| leading: Icon( | |
| iconList[index].icon, | |
| size: 45.0, | |
| color: ColorPalette.grey60, | |
| ), | |
| title: Text(iconList[index].title,style: TextStyle(color: Colors.black87, fontSize: 20.0),), | |
| ), | |
| ), | |
| ), | |
| ), | |
| )); | |
| } | |
| } |
มาที่
class _MyHomePageState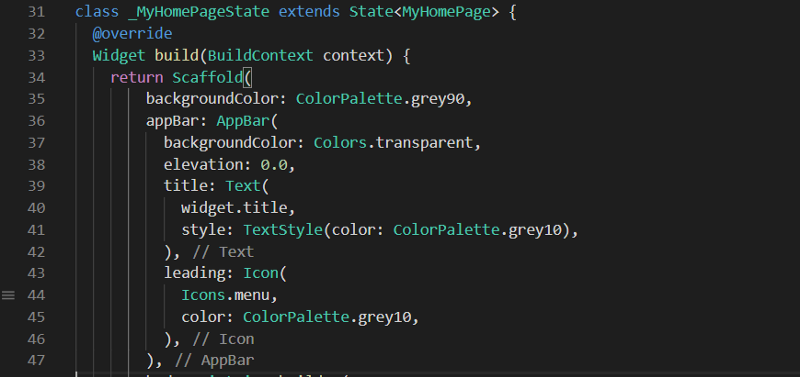
ใน
ScaffoldColorPalette.grey90
ต่อมาใน
Appbarelevationleading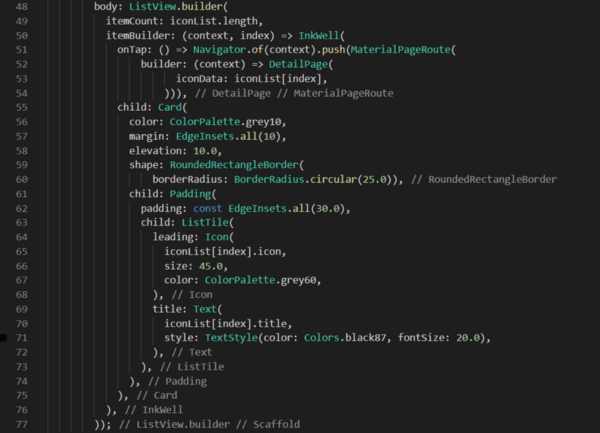
ต่อไปเราส่วน body เราจะทำเป็น
ListViewListView.builderCardListTileมาอธิบาย Widget ที่ใช้กันก่อน

- Card จะช่วยสร้างสี่เหลี่ยมผืนผ้านมุมมน ให้อัตโนมัติ เราเพียงส่ง
child เข้าไปก็ใช้งานได้ทันที ถ้าอยากปรับความมนของขอบก็ส่งWidget
เข้าไปได้เลยshape:
เมื่อมี
CardWidget ListTile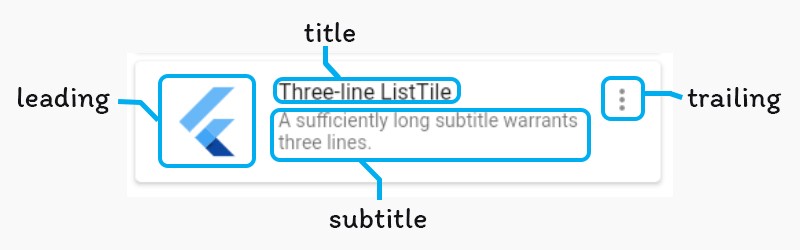
- ListTile จะประกอบไปด้วย 4 ส่วนหลักๆ leading, title, subtitle, trailing ซึ่งถ้าเราอยากวางตรงตำแหน่งไหน ก็ส่ง
child ของเราเข้าไปตรงนั้นเลย (ปล.ไม่จำเป็นต้องอยู่ในWidget
นะ แค่ส่วนใหญ่ชอบใช้คู่กัน)Card
ที่เหลือเราก็จัดรูปต่อ ใส่
padding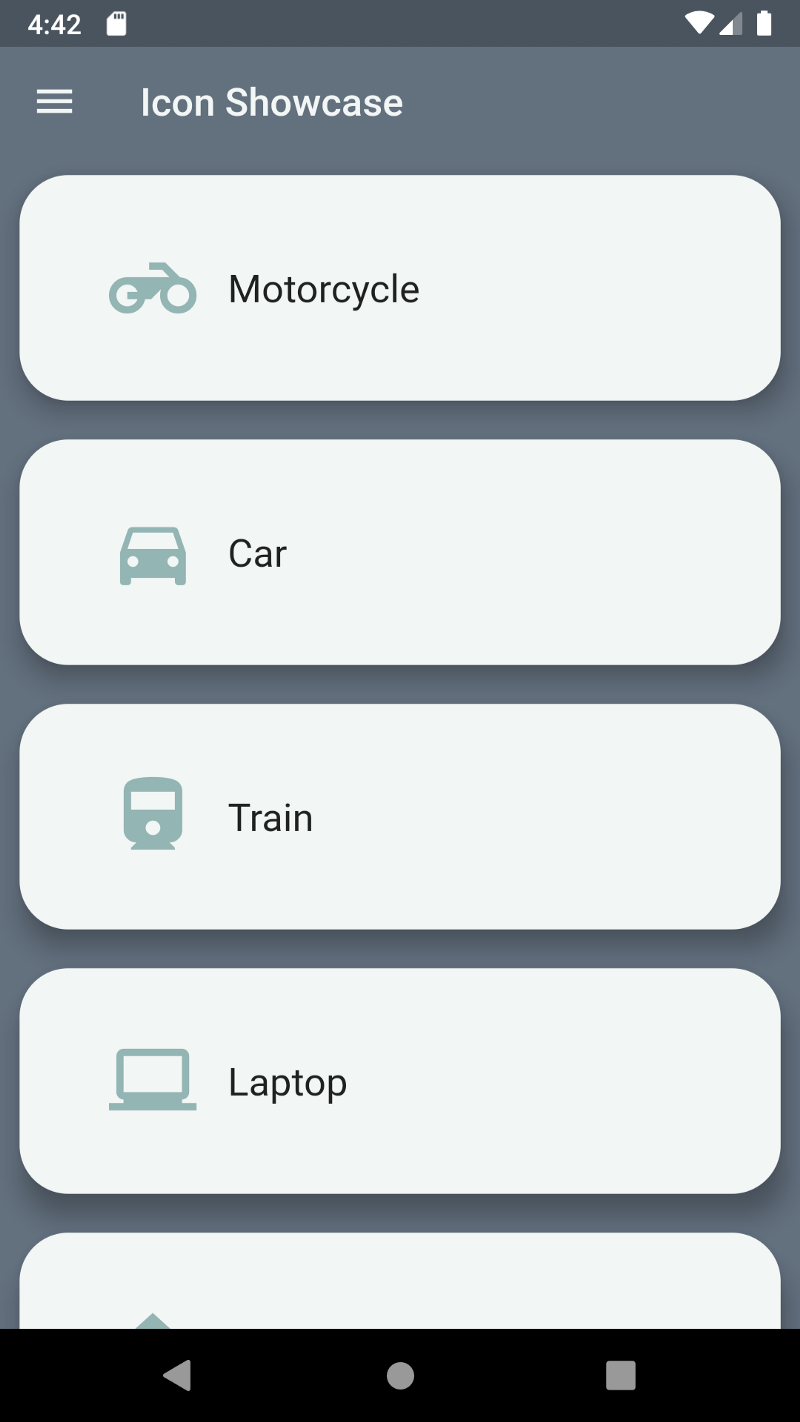
หน้ารายละเอียด
เรามาลองทำอะไรทีซับซ้อนมาหน่อย ไปกันที่หน้า
detail_page.dart| import 'package:icon_showcase_design_part/color_palette.dart'; | |
| import 'package:icon_showcase_design_part/icon_data.dart'; | |
| import 'package:flutter/material.dart'; | |
| class DetailPage extends StatefulWidget { | |
| final IconModel iconData; | |
| DetailPage({Key key, @required this.iconData}) : super(key: key); | |
| @override | |
| _DetailPageState createState() => _DetailPageState(); | |
| } | |
| class _DetailPageState extends State<DetailPage> { | |
| @override | |
| Widget build(BuildContext context) { | |
| return Scaffold( | |
| backgroundColor: ColorPalette.grey90, | |
| body: SafeArea( | |
| child: Card( | |
| margin: EdgeInsets.all(10), | |
| clipBehavior: Clip.antiAlias, | |
| elevation: 0.0, | |
| color: ColorPalette.grey10, | |
| shape: RoundedRectangleBorder( | |
| borderRadius: BorderRadius.circular(25.0)), | |
| child: Stack(children: <Widget>[ | |
| Positioned.fill( | |
| bottom: -90, | |
| right: -90, | |
| child: Align( | |
| alignment: Alignment.bottomRight, | |
| child: Icon( | |
| widget.iconData.icon, | |
| size: 400, | |
| color: ColorPalette.grey30, | |
| ))), | |
| Container( | |
| width: MediaQuery.of(context).size.width, | |
| height: 500, | |
| child: Padding( | |
| padding: const EdgeInsets.only(left: 20.0, top: 20.0), | |
| child: Column( | |
| crossAxisAlignment: CrossAxisAlignment.start, | |
| children: <Widget>[ | |
| InkWell( | |
| onTap: () { | |
| Navigator.of(context).pop(true); | |
| return Future.value(false); | |
| }, | |
| child: Icon( | |
| Icons.arrow_back, | |
| )), | |
| Text(widget.iconData.title,style: TextStyle(color: Colors.black87, fontSize: 60.0),), | |
| ]))), | |
| ])), | |
| ), | |
| ); | |
| } | |
| } |
ในหน้านี้ ตัว
ScaffoldappbarbodywidgetSafeArea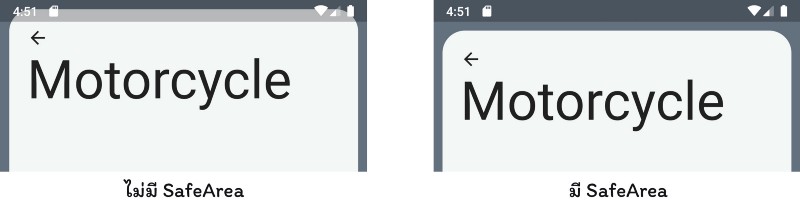
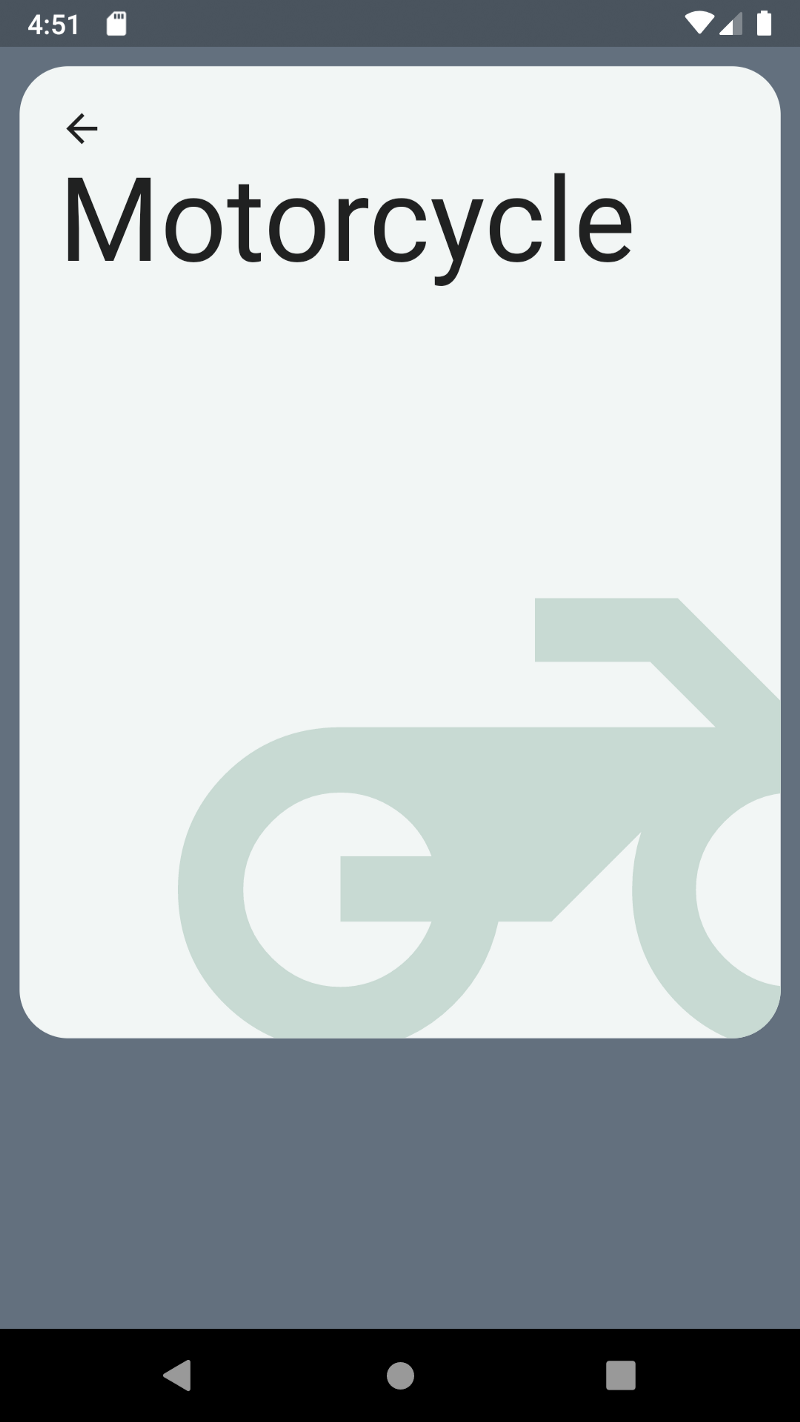
- SafeArea จะช่วย padding หลบพวก notification bar, รูกล้อง (notch, punch hole) ให้อัตโนมัติ
ต่อมาเราก็จะใช้ Card เช่นเคย
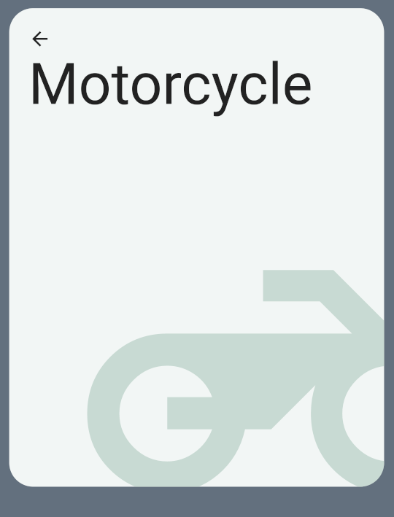
เพื่อให้เราสามารถยัดหัวข้อกับไอคอนในตำแหน่งดังรูปด้านบนได้ เราก็เลือกใช้
Widget Stack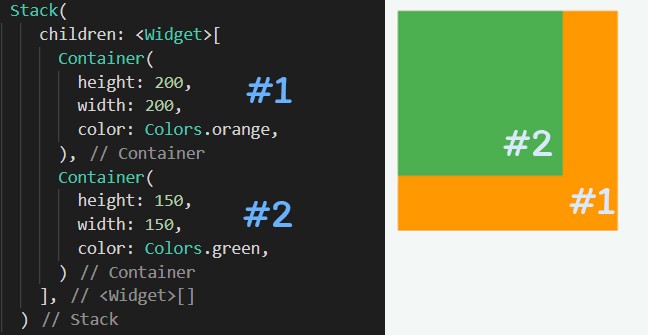
- Stack เป็น Widget ที่รับ Children หรือ Widget หลายๆอัน แล้วนำมาซ้อนทับกัน โดย อันที่อยู่ก่อนจะอยู่ด้านหลัง แล้วอันที่อยู่หลังจะอยู่ด้านหน้า นอกจากนี้ถ้าต้องการให้ child แต่ละอันของเรามีตำแหน่งอื่น อยากให้อยู่มุมอื่น เราจะใช้ Widget Positioned หรือ Widget Align มาช่วย
- Positioned จะต้องใช้ใน Stack เท่านั้น เพื่อจัดให้อยู่ในตำแหน่งที่เราต้องการแบบละเอียดได้
- Align ช่วยให้ Widget ของเราอยู่ตามตำแหน่งอย่างง่ายได้เลย เช่นตามมุมต่างๆ ตรงกลาง กลางซ้าย ฯลฯ
เมื่อจัดทุกอย่างเรียบร้อบแล้ว ผลลัพธ์เราก็จะออกมาตามนี้
สุดท้ายอย่าลืมใส่
Navigatormain.dartdetail_page.dartdetail_page.dart

ตอนนี้การดีไซน์ของเราก็จบลงแล้ว
ไว้มาต่อกันพาร์ทหน้า เราจะมาใส่อนิเมชั่นให้เกิดความพริ้วไหวมากขึ้น รอติดตามต่อไป
โค๊ดทั้งหมดของพาร์ทนี้สามารถโหลดได้เลยจาก Github ด้านล่างนี้เลย

มาแล้วพาร์ทถัดไป ส่วนของอนิเมชั่น